
Slot and curved slot
Purpose
Two tools for the most common hole shapes in sheet metal and machine design: the slot made of two semicircles and two straight flanks, and the curved slot as an arc-shaped slot. Both are created as a group of four elements — two lines or arcs for the flanks and two semicircular arcs for the ends.
The group is named Langloch or Bananenloch; if several occur in a drawing they are numbered. In the Groups section the whole slot can be selected, moved or deleted with one click on its row (groups).
Access
- Ribbon: group Draw, triangle on the Rectangle button — entries Slot (2) and Curved slot (3).
- Classic toolbar: drop-down triangle of the rectangle family (2).
- Command search : Langloch or Bananenloch.

Slot
Slot Three steps:
- Click the first semicircle centre (1) — Click the first semicircle centre.
- Click the second semicircle centre (2) — Click the second semicircle centre. The two points fix axis and length; the field L/∠ at the pointer also accepts them as numbers.
- Set the width (3): click beside the axis — the distance to the axis gives half the width — or type the value into field B and press Enter. Status bar: Pick the width: click beside the axis — or type it and Enter.

The click in step 3 takes the live measured width: with object snap you can pick it up from existing geometry. At the end the status bar reports Slot drawn — group “Langloch” (width b). If both centres coincide, Slot: the two centres coincide appears.
Curved slot
Curved slot The arc-shaped slot needs four inputs:
- Click the arc centre (1) — Click the arc centre.
- Click radius and start angle in one go (2) — Click radius and start angle — or type them (Enter); the field R/∠1 runs live.
- Click the end angle (3) — Click or type the end angle — counter-clockwise. The arc always runs counter-clockwise from the start to the end angle.
- Set the width (4): click beside the arc or type it into field B — Pick the width: click beside the arc — or type it and Enter.
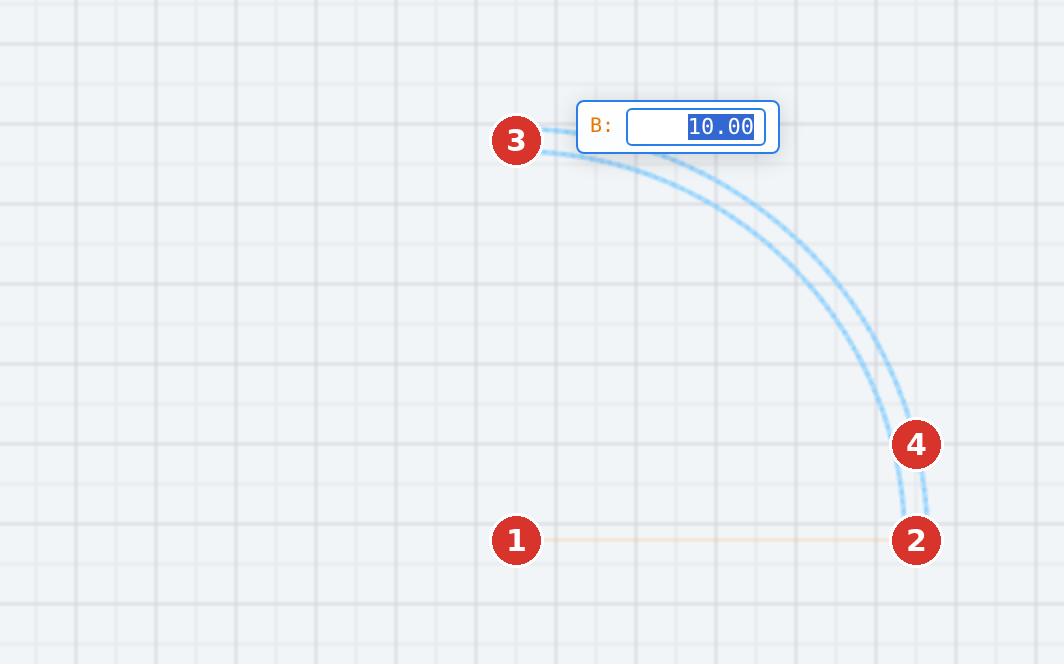
At the end the status bar reports Curved slot drawn — group “Bananenloch” (width b). Three cases are refused: a missing radius (Curved slot: please set the radius first), a width larger than the radius can carry (Curved slot: the width is too large for the radius) and angles lying too close together (Curved slot: start and end angle are too close together).
The remembered width
Both tools remember the width last used and offer it again on the next call; the factory value is 10 mm. A click in the width step takes the value currently in the field if you click exactly on the axis — to pick up a width, click beside the axis.
Options
- All four parts are created on the active layer; pick up attribute (J) applies beforehand.
- Object snap applies to the centres; ORTHO keeps the axis horizontal or vertical.
- The whole slot is one step for Undo.
- To change a finished slot you edit the individual elements of the group — there is no later parameter change.
In the German interface the instruction bar shows only the internal identifier (slot, slotarc) without a step text for both tools; the status bar guides through the whole sequence (program version v3.0.24).