
Drawing
What belongs to drawing
LiberoDraft creates geometry with tools: you start a tool, click points or existing elements and obtain lines, circles, arcs, ellipses, polylines or splines. All tools follow the same pattern, which is why this section is worth reading once for all of them: it describes what applies to every drawing tool. The individual commands then follow in the command reference.
The first steps with line, rectangle and circle are described in Drawing — first steps.
The six families
Related tools are combined into families. In the ribbon each family carries a large button with a triangle underneath, in the classic toolbar a button with a drop-down triangle beside it. The button itself starts the head of the family, the triangle opens the list of the related tools.
| Family | Tools |
|---|---|
| Line | Line · Angle bisector · Perpendicular · Tangent ⊥ · Tangent from point · Tangent to 2 circles · Double line · Relative angle |
| Rectangle | Rectangle · Slot · Curved slot · Rectangle 3P |
| Circle | Circle · Circle 3P · Circle tang. 3 · Circle tang. 2 · Ellipse · Ellipse from centre · Ellipse in rectangle |
| Arc | Arc · Arc 3P · Arc S/E/R · Arc tang. 2+R · Arc tang. 1+R |
| Point | Point · Divide points |
| Polyline | Polyline · Spline curve |
The polygon stands on its own, without a family.

 left half
 right half
 left half
 right half
A click on the triangle shows the list under the heading RELATED TOOLS:


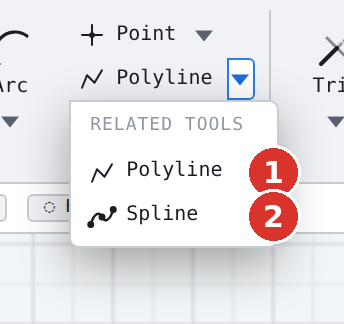
If a family button does not show the tool you expect, the option Remember variant is switched on in the gear window: the button then carries the last tool used from that family instead of the head of the family (Settings).
Every tool can also be started from the command search and from the tool window; tools you use often can be put into the favourites bar.
What always applies while drawing
Setting points. Every click on the drawing area is guided by object snap: endpoint, midpoint, centre, intersection and the other snap kinds provide exact reference points, K opens coordinate entry. ORTHO and TRACK apply to all tools that set free points.
Numbers instead of clicks. As soon as a tool expects a second point, the floating input field appears at the pointer. Depending on the tool it accepts length L, angle ∠, radius R, diameter, width B or gap A; Tab switches between the fields, Enter accepts. The field always travels with the mouse — so you can click or type.
Elements instead of points. The constructing tools (angle bisector, perpendicular, tangents, circle and arc tangent) do not expect free points but existing elements. Where you click an element matters: the click side decides which of the mathematically possible solutions is drawn.
Pick up attribute (J): takes colour, line width and line type from an existing element for everything you draw afterwards.
Active layer. Every new element is created on the active layer with its colour, width and line type, unless an override is set.
Cancelling and ending. Esc cancels the current entry; a second Esc ends the tool. Tools with continuous entry (line, polyline, spline, double line) continue at the last point after every element until you end them.
Undo. Every element drawn is a separate step for Undo (Ctrl + Z); with tools that create several elements at once the whole operation is taken back.
Single elements, chains and groups
The tools deliver different results — which matters when you change them later:
| Result | Tools |
|---|---|
| One element | Line, circle, arc, ellipse, rectangle, polygon, point, spline; polyline as one connected element |
| Several single lines | Double line (both runs and the closing strokes), rectangle with the option As single lines |
| Group | Slot and curved slot — their parts lie in a group of their own |
Anything made of several parts can be edited part by part; a group is selected as a whole through its row in the Groups section.
Display while drawing
The status bar names at every step what is expected next; all these messages are listed with cause and remedy under Messages while drawing. Above the drawing area the instruction bar shows the name of the tool, the current step and the mouse assignment.
For six tools — tangent ⊥, tangent from point, tangent to 2 circles, double line, slot and curved slot — the instruction bar shows only the internal identifier (tanperp, dline …) and no step text in the German interface; for Ellipse and Ellipse from centre this is the case in both languages. In these cases the status bar guides you through the whole sequence (program version v3.0.24).
If the option Create dimension while drawing is switched on, every new element receives its dimension (live dimensioning).
Continue
- Construction lines: angle bisector, relative angle, perpendicular
- Tangents · Double line
- Slot and curved slot · Rectangle (3 points)
- Circle constructions · Ellipses
- Arcs · Arcs tangent
- Point · Polygon · Polyline · Spline curve