
Dimension
Purpose
Places a dimension on an element or between two points: length, distance, diameter, radius, angle. The value is measured and follows the geometry. Background and connections: Dimensioning.
Access
- Ribbon: group Annotate, button Dimension. If the window is narrow the group is collapsed — the arrow under the group icon (1) opens the list with Dimension (2), Chain dim. (3), Baseline (4), Arc length (5), Angle 3P (6), Datum (7), Feature frame (8) and Send to back (9).
- Classic toolbar: split button Dimension (1) — the arrow next to it opens the list with chain dimension, baseline dimension, arc length dimension, angle from 3 points, datum feature, feature control frame, send to back, balloon and note. The gear on the right (2) opens the list with Dimension settings.
- Key: D.
- Command search : type Dimension.


 left half
 right half
On start the snap mode switches to Automatic (status bar: Dimension — snap mode → automatic); when you leave the tool the program restores the previous snap mode. The instruction field shows ↔ Dimension with the step Click an element → position the dimension line, the tooltip at the pointer Dimension: click an element or point. At the lower right the floating panel Defaults for new dimensions appears with text height, decimal places, unit, zeros, colour and arrow sizes for the next dimensions.
Procedure
The first click decides which kind of dimension is created: if it hits a point with point snap (endpoint, midpoint, centre, intersection, tangent), a point-to-point dimension begins; if it hits an element without point snap, an element dimension begins; if it hits empty space, a point-to-point dimension with the free point begins as well.
Dimension an element
- Click a line, circle, arc or rectangle. The element is highlighted; the status bar reads Position the dimension line or click a 2nd element….
- Move the pointer — the preview shows dimension line and value. For a line the distance of the pointer sets the position of the dimension line, for a circle and arc the position of the text, for a rectangle width and height lie inside (pointer inside the rectangle) or outside together.
- Click in empty space. The dimension is placed (Dimension placed), and the Edit dimension dialog opens at once next to the click point so that you can choose driving/driven and enter a value. Cancel or Esc closes it without change.

For a circle the text follows the pointer freely on the dimension line, also inside the circle.
Radius dimension of an arc
Since program version v3.0.40 the arrowhead on an arc follows the angle of the pointer to the centre — freely and even beyond the ends of the arc; the text stands at the distance of the pointer. If the arrow lies outside the arc span, the program draws an auxiliary dimension arc of the same radius: it runs from the nearer end of the arc to the arrow and reaches a little beyond it, just as an extension line reaches beyond the dimension line. That keeps it visible which arc the dimension belongs to. The auxiliary arc is printed and written to the dimension layer on DXF export.
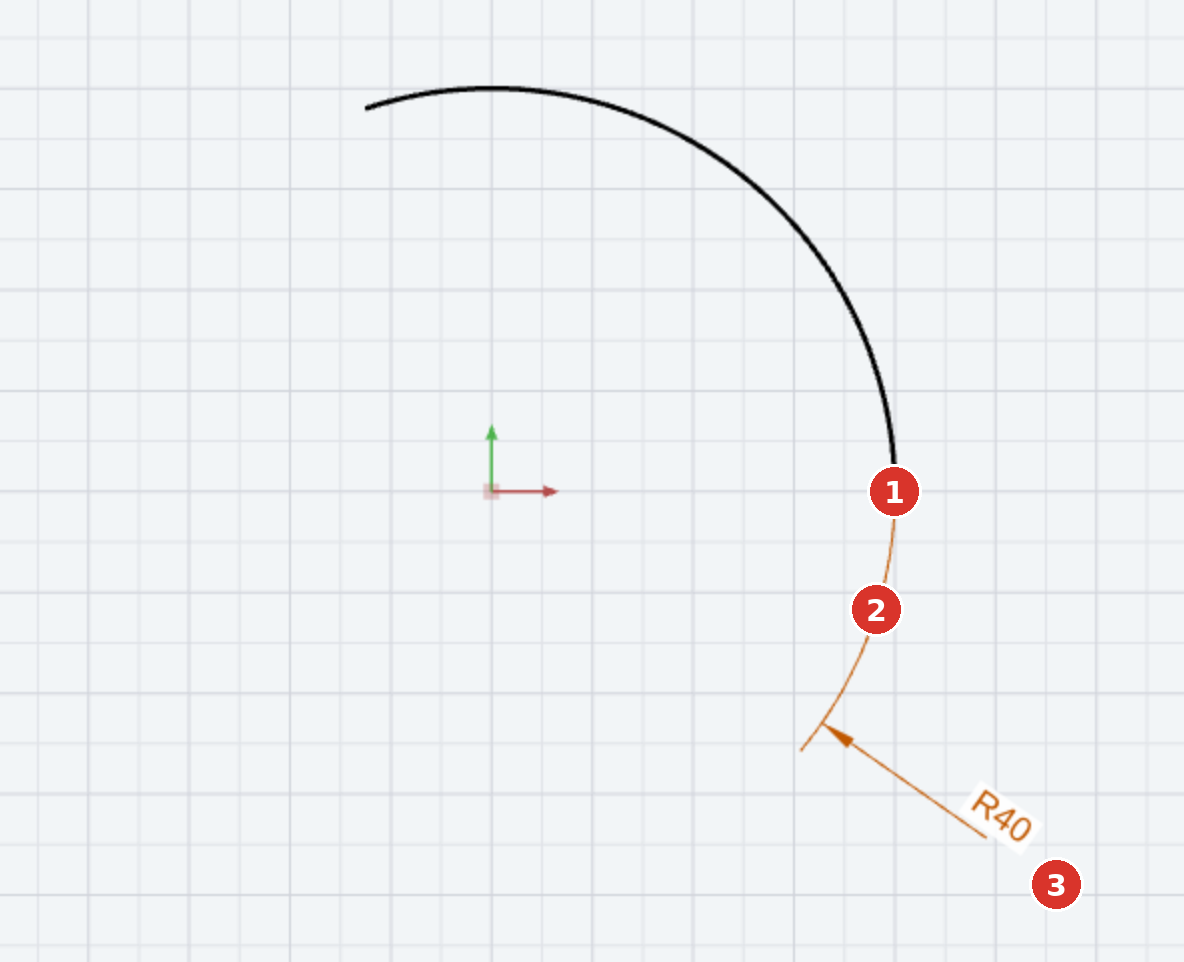
Hold Shift and the arrow stays at the angle of the first click while the pointer only controls the distance of the text along the radius line — the behaviour up to v3.0.39.
Dimension two points
- Click the first point with snap (Click the 2nd point for the dimension…).
- Click the second point with snap (Position the dimension line (H/V automatic)…). If both points are identical, the status bar reports Identical point — click a different point.
- Move the pointer: inside the rectangle between the points the aligned dimension is created, left or right of it the vertical one, above or below the horizontal one. Clicking places the dimension.

Angle between two lines
- Click the first line (without point snap).
- Click a second, non-parallel line (Choose the angle sector with the mouse, then click…). Both lines are highlighted.
- Move the pointer into the desired sector at the intersection — the four sectors result from the two lines and their extensions — and click (Angular dimension placed). The distance of the pointer from the intersection is the radius of the dimension arc. Edit dimension opens here as well.

If the two legs cannot be selected as lines — at the bend of a polyline, for instance — or if there are no lines at all, dimension the angle from three points: Angle from 3 points.
If the lines do not intersect (because they are parallel), the parallel distance is created instead of the angle: after the second click you position the dimension line (Position the dimension line…) and click. If at the second click you snap a point that lies on the first line itself (say the shared corner of two lines), the click counts for the second line lying there and the angular dimension is created; if no second line lies there, the status bar reports The point lies on the line — no distance possible.
Distance line–point
If you first click a line and then, with point snap, a point that does not lie on the line (for example a circle centre), the perpendicular distance from the line to this point is created, aligned with the line direction. The other way round works too: first the point with snap, then the line without snap. Position and click (Distance dimension placed).
Alignment snap while placing
Since program version v3.0.47 a dimension line snaps onto the alignment of an existing parallel dimension line already while being placed — until then that happened only when moving it afterwards. As soon as the preview comes within eight screen pixels of the alignment it jumps onto it, and an alignment line is shown, extended beyond both dimensions.

To leave it, simply keep moving — there is deliberately no key to suppress it while placing (when moving a dimension afterwards, Ctrl does that). The snap is skipped when Snap dimensions (smart guides) is switched off or when the grid snap determines the position.
Covered are element dimensions on lines, all point-to-point dimensions (horizontal, vertical, aligned) and, since v3.0.48, the distance dimensions line–line and line–point. Left out — as when moving — are radius, diameter and angular dimensions as well as the double dimension on a rectangle, where one common offset controls two dimensions. In a series and in a chain dimension the alignment is computed once so that the dimension and the position taken over by the following ones lie on the same line; the skewed chain keeps following its own logic.
Snap in two phases
The tool remembers two snap modes: one for grabbing the geometry (phase 1) and one for placing the dimension line (phase 2). If you change the snap in phase 2 (say to grid so that dimension lines align), it becomes active again automatically at the next placement, and after placing the program returns to the snap of phase 1.
Options
The defaults for new dimensions are in the Dimension Settings dialog; the values of a single dimension you change in the Edit dimension dialog and in the attribute panel.
| Option | Meaning |
|---|---|
| Mode driven / driving / detached | dimension measures the geometry / forces it to the value / shows free text — see Modes. |
| Prefix, suffix, tolerance | additions to the dimension text, tolerances. |
| Text height, decimal places, unit | in the floating panel for the next dimensions, in the attribute panel for selected dimensions. |
| Dimension offset while drawing | offset of the automatically created dimensions, see Live dimensions. |
Keys
| Key | Effect |
|---|---|
| D | Start dimensioning |
| Esc | Cancel the current dimension, end the tool |
| Q, E, M, S, Z, G, F | Change snap mode (automatic, endpoint, midpoint, intersection, centre, grid, free) |
| J | Pick up: adopt mode, text height and unit of a dimension as default |
| Enter in the Edit dimension dialog | OK |
| Del | Delete selected dimensions (Select tool) |
| Shift-click | Add a dimension to the selection |
| Double-click, Ctrl+double-click | Edit dimension, attribute panel |
| Ctrl while dragging | Suppress snapping of the dimension text (there is no such key while placing) |
| Shift on the radius dimension of an arc | Keep the arrow at the angle of the first click |
| PgUp, PgDn | Z level of the selected dimensions |
Related commands
- Chain dimension Chain dimension and Baseline dimension Baseline dimension — series modes of this tool
- Arc length dimension Arc length dimension — arc length instead of radius
- Angle from 3 points Angle from 3 points — angle without selectable lines
- Dimension settings — defaults and dimension styles
- Send to back Dimensions to back
- Select — move dimensions, move the text, reposition reference points
- Explode — convert polylines into lines and arcs so that they can be dimensioned as elements; dissolve dimension chains into individual dimensions