
Groups
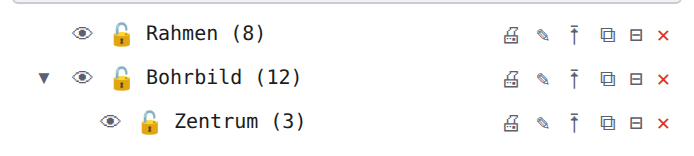
A Group bundles elements, dimensions and hatches under one name without changing them. A click on the group selects all members; eye, lock and print switch act on the whole group. Groups can contain subgroups — the tree in the “Groups” section shows the order like a file explorer.
This page describes the relationships. Step by step: Create and arrange groups, Copy a group. Commands: Group elements, Add to group, Remove from group. Field by field: “Groups” section.
Group or block?
A group is a bundle: the elements stay independent, keep layer, colour and dimensions and can be edited individually. A block is a definition with instances — one change acts on all copies. Groups suit ordering and joint show/hide, blocks suit recurring parts with a bill of materials.
Creating a group
Select elements and call “⊞ Group elements” — in the right-click menu of the drawing area, in the “Edit” section of the tool window, in the command search or in the area menu of the section (“New group from selection …”). The floating field “Group name:” proposes “Gruppe n”; Enter or ✓ accepts. Without a prior selection the post-selection starts. Only dimensions or hatches form a group too (since v3.0.23).

When creating:
- An element belongs to at most one group — it is taken out of an old group.
- Dimensions whose reference elements all lie in the group come along automatically; a dimension drops out again when a reference leaves the group.
- New groups always appear on the top level; arrange them afterwards via picker or dragging.
- Drawing steps such as slot, arc slot, coordinate table, standard parts and add-ons store their elements as a group by themselves (“Langloch gezeichnet — Gruppe „…“”).
An empty group is created with “+ New” in the section or “New empty group …” in the area menu; “New empty subgroup …” in the row menu creates it directly under a group. Such groups persist (containers for later); a group whose elements are deleted, however, disappears by itself — unless it still has subgroups.
Subgroups
Every group can hold subgroups and, next to them, its own elements (mixing allowed). The tree shows subgroups indented with a fold triangle in front of the parent; a click on a parent selects its elements including all subgroups.

Eye, lock and print
| Switch | Effect | Inheritance |
|---|---|---|
| 👁 eye | hides or shows the members; the selection is cleared | inherited: parent off → all subgroups off (eye pale, tooltip “hidden by parent group”) |
| 🔒 lock | members visible but not selectable (“Element belongs to a locked group — unlock the group to edit”) | cascade: locking the parent sets the lock of all subgroups, afterwards each can be switched individually; whatever is dragged into a locked group is locked too |
| excludes the group from printing (struck through, red) | inherited like the eye |
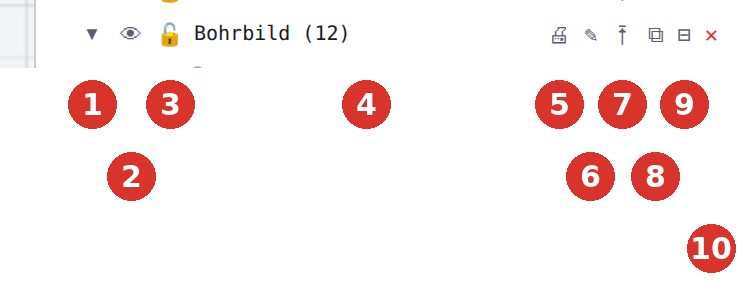
The collective switches in the toolbar act on all groups at once and form a single undo step: 👁 all on/off, ◐ invert visibility, 🔓 unlock all, 🔒 lock all, ◑ invert locking — per group, without cascade.

Layer and group act together: an element is visible and selectable when both allow it (Layers). Eye and lock of the groups belong to the drawing and are saved with it.
Seeing the selection in the tree
If the selection contains elements of a group, its row gets a blue bar at the left edge, its parents a pale one; folded branches open when the selection changes. The “Properties” panel shows the full path “⊞ Bohrbild › Zentrum” above — a click on it scrolls the row into view and lets it flash briefly.


Moving and arranging groups
Two ways arrange the tree:
- Picker “Move into group …” (row button ⭱ or row menu): the target is another group or “Top level”; the window has the same live search as the section.
- Dragging by the name (from 4 px of movement): onto the middle of a row = into that group; onto the upper or lower edge of a row (6 px each) a blue line appears = to this position, on the same level as the row — one gesture for re-ordering and re-parenting; onto the header or below the list = top level. A forbidden target is shown by the “not-allowed” cursor.


A group cannot be moved into itself or one of its subgroups (cycle protection). During a running search there is no line. The order of the tree is saved with the drawing and survives undo.
Copying, clipboard
⧉ Copy group builds a package from the whole subtree and attaches it to the mouse — a click places the copy (“Group "…" is attached to the mouse — click places the copy”). The root is named “Name (Kopie)”, subgroups keep their names, empty subgroups come along, the parent of the original is kept. Dimensions, constraints and welds between the subgroups travel along. A group of only dimensions or hatches can be copied just as well, as long as the dimensions manage without their elements — the same rules apply as for Ctrl + C (Dimensions and hatches without elements). If nothing copyable is left, the status bar reports “Nothing copied”, where applicable with the addition “ · n dimension(s) without reference skipped”; a group that holds nothing in its whole subtree reports “The group is empty”.

Ctrl + C / Ctrl + V preserves the group structure of the copied elements (since v3.0.6); loose elements stay loose. If only part of a subgroup is copied, its parents are created as containers. Standard parts and imported drawings, by contrast, get a collective group with the package name (Insert standard part, Import drawing).
Dissolving and deleting
- ⊟ Dissolve grouping releases the group, the elements stay; subgroups move up one level (“Grouping "…" dissolved — the elements are kept”).
- ✕ Delete the group and its elements asks first (“Delete group "…" and its n object(s)? (Undo possible with Ctrl+Z)”; elements, dimensions and hatches are counted together). Everything is deleted — locked or hidden parts too. For a group with subgroups a picker appears instead: “Delete only this group (subgroups move up)” or “Delete with all n subgroup(s)”.
- Delete empty groups (n) in the area menu removes all empty groups — empty means: no own elements and all subgroups empty. The dialog “Check & clean drawing” in the file menu offers the same as the finding “empty element groups (including intentionally empty ones)”.

Right-click menus of the section
The right mouse button on a row offers the main group functions (select, rename, move, copy, dissolve, delete, show/hide, lock, print, new empty subgroup — and with a selection “Put selection into this group (n)”); on the free area or the header: new empty group, new group from selection, delete empty groups, show/hide all, unlock/lock all, expand/collapse all. The search field keeps the browser menu.


Related topics
- Layers — levels with colour, line type and width
- Z levels — order of overlapping objects
- Blocks — definition and instances instead of a bundle